Basics of Exposure:Aperture, ISO, Shutter & Exposure Triangle
If you’ve been taking photos on your automatic camera for quite some time, you know that a good number of the photos you took have turned out quite a bit disappointing. They’re could be too dark, too light, or blurred. Most of these problems have to do with incorrect “exposure”. No matter what type of photography you do, proper exposure is the key to get a photograph that looks right.
What is Exposure?
Exposure in photography is the amount of light that hits your camera’s light sensors. Correct exposure means putting correct amount of light on your camera sensor. Too much light and you will have an over-exposed picture. Not enough light and your photo will be under-exposed.
How Correct Exposure is determined?
Light enters through your camera’s lenses, then passes through a hole located inside the lens called an aperture, and then hits the film or the digital sensor. Every camera has a Light meter, a Metering system and an Exposure meter. Light meter measure the amount of ambient or available light & Metering system determine and calculate the correct Exposure based on light meter’s reading for that particular scene. Depending on your camera setting the Exposure meter will display the calculated exposure on a scale (usually on camera’s view finder or LCD panel) with “zero” indicator at the middle. “zero” means correct or balances exposure. Less than “zero” or “minus” means under exposure or insufficient light. More than “zero” means over exposure or too much light.

Camera Viewfinder
The Balance
(Two things governs the exposure: the Amount of available light & Controllers of light.)
Available Light
The key to all photographs, whether shooting with film or digital cameras, is light. It will determine how will you compensate or balance the exposure. The rule is simple. If there is too much light you have to reduce it to correct the exposure and in low light situations you have to increase light supply. In automatic mode, your camera will adjust or balance the right amount of light for you by selecting the right settings with the help of controllers (Aperture, Shutter, ISO), but in manual exposure mode you have to set them on your own.
The Controllers of lights
There are three parameters which controlls the amount of light. Together they form Exposure Triangle. And the beauty is they can balance each other.
1. Aperture : controls amount of light flow & Depth Of Field
2. Shutter speed: controls time of light flow, motion blur & freeze
3. ISO: controls light sensitivity & Noise or Grain

The flow of light that goes into the camera is controlled by aperture. Shutter speed controls the amount of time that the light is allowed to stay on the photosensitive material. The ability to absorb light by the sensor is controlled by ISO.
Exposure triangle
Exposure triangle includes adjustment of ISO, Aperture and Shutter speed settings so that a photographer can use manual controls over his compositions and shoot pictures.
Exposure is the term used in photography to measure the amount of light that passes though lens and hits the photosensitive material inside your camera. This could either be a film or in the case of a digital camera, a digital sensor. Now, the amount of light needs to be controlled. Otherwise, you’ll get a photo that is either too bright (over-exposed) or too dark (under-exposed) photo. Aperture controls the flow of light that goes into the camera. Shutter speed controls the amount of time that the light is allowed to stay on the photosensitive material. The ability to absorb light by the sensor is controlled by ISO.

Modern digital cameras are wonderful pieces of equipments. They have a built in light mater and metering system. The Light meter can measure the amount of reflected light that is coming from the subject and metering system determine the correct exposure based on that measurement. Depending upon the amount of light, it can also display the exposure on camera’s exposure meter. Exposure meter is a scale with “zero” at the middle and usually located on viewfinder, top or rear LCD panel. “Zero” means correct exposure. Below “zero” or “minus” means underexposure and above “zero” or “plus” means overexposure.
*Exposure meter on Camera Viewfinder
Now your camera metering system has determined the right exposure for you. In “Auto” mode the camera tries to keep the the indicator at “zero” level by adjusting the Aperture, Shutter speed and ISO. Unfortunately, with an automatic mode, you won’t be able to control the necessary settings like aperture, shutter speed and ISO. To be able to control these you will need to have a camera, either digital or film, that has manual settings. Fortunately most modern digital cameras have that options. If your switch to ”Manual” mode, based on your current Aperture, Shutter & ISO settings, your camera exposure meter’s indicator will indicate your current exposure. It could be under (on the left), over (on the right) or correct (at the middle). In order to get the correct exposure, you will need to carefully balance aperture, shutter speed and ISO and bring the indicator to “Zero”. Unless you deliberately want under or over exposed picture.
Let’s understand in deeper detail on Aperture, ISO and Shutter speed, what they are and how they affect your photographs. A major advantage of understanding the key aspect of exposure can help you to get out of the ‘Auto’ mode and have more controls over your compositions.
Aperture
It controls the light by adjusting the diameter of lens opening through which the light passes and reaches the sensor. It also controls the Depth Of Field (DOF). Aperture is denoted by f stops. F divided by a number. The larger the number the smaller is the aperture and vice versa. Yes, this is a bit confusing, but hopefully you will get the hang of it. Smaller the opening the more focused the light is and as such more of the picture is in sharp focus or more DOF. Conversely the larger the size of the opening, the more diffused the light is and lesser is the area of the frame that is in focus or less DOF. Both have its advantages. Smaller aperture is required when you are shooting a group photo or a landscape when you need the entire frame to be in focus or more depth of filed is required. Larger apertures are required for shooting close-ups and especially when you need to blur out the background (bokeh), such as when shooting a flower or say a bird perched on a tree. Read more on aperture here

Shutter speed
It controls how long the light is allowed to pass though the aperture. Longer the time more light can pass & vice-versa. This is critically important and often used in direct inverse relation with that of aperture. Larger the aperture the faster is the required shutter speed and vice versa. Faster shutter speeds are required when you want to freeze the action, such as shooting a surfer riding the swells or may be when you want to capture the moment when your 9 year old son hits a home run. Slower shutter speeds are actually used for more dramatic results such as when you need to create a silky smooth effect of the water when shooting a waterfall. Read more on shutter speed here

ISO
In the days of film cameras people would purchase film of varying speeds. The faster the film is, the more light sensitive it is and vice versa. It is necessary to know the difference as otherwise the shots would get over or underexposed. Today’s digital cameras use sensors in place of films but they function more or less the same way. So when shooting in low light conditions, you need a higher ISO and vice versa. Thankfully you can change that from within the camera according the conditions. There is however one important thing to note about ISO. The higher the ISO setting the more is the noise in the images. Sow when shooting in indoor or dark conditions try selecting an optimum ISO and complement it with flash to fill the dark areas. Read more on ISO here.

Depth of Field
Depth of field is usually described as the amount of the frame that is in sharp focus. When we look at a scene with our naked eye almost everything appears sharp. But that is not the case when we compose the same scene with cameras. Some part of it is blurred out. The more the frame is in sharp focus, the more is the depth of field and vice versa.

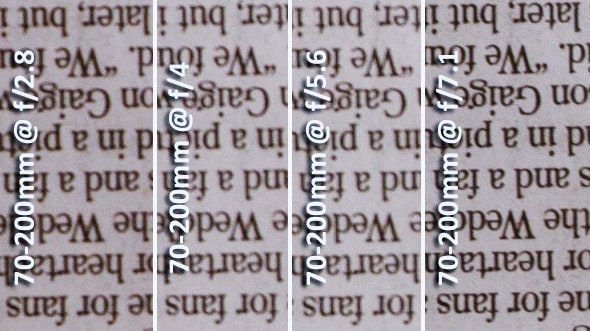
There is an inverse relationship between the aperture of your lens and the depth of field. Narrower is the aperture more is the depth of field. Usually when you set your lens to f/1.2 or f/1.4 (in a prime lens) or f/2.8 (in a zoom lens) a soft blur is created around the back and front of the subject. This is also known as bokeh. When this happens only a small part of the frame (depending on where you’re focusing) is n sharp focus and the rest is blurred out.
When you reduce the aperture the whole frame starts to get into sharp focus. The narrower the aperture the sharper is the image. As you move from of f/4 or f/5.6 all the way to f/11 and beyond the images get sharper and sharper. The reason is the light rays reflected against the subject and passing through the aperture gets refracted by the front element of the lens and meets the sensor at a precise point creating a sharp image. Narrower the aperture more precise is this meeting of light creating a sharper image and thus bigger depth of field.

Depth of field also depends upon the kind of lens that you use. A wide angle prime lens offers more soft blur because it has a wider aperture. But if you stop down to f/8 and even narrower, a large depth of field can be created. A wide angle lens reduces the perspective of the subject as it fits in more inside the frame; also know as field of view. As such a hut on the beach will appear smaller than the actual real life size when the picture is finally taken. On the other tele lenses have an effect of increasing the size of the subject on the final image. The higher magnification allows you to capture more detail of the subject but also reduce the field of view and the depth of field.
Basic tips to play around with depth of field
Set your aperture to a minimum of f/8 to make sure you have a good platform to start with. Always ensure that you zoom out and exploit the widest limits of your lens, even if you’re using a tele lens. Tele lenses have a narrow maximum aperture so once you have zoomed out completely you may still have an aperture of f/4 to start off. Wide angle lenses can pack in a lot provided you can start at f/8 or even narrower. When shooting landscape or any other subject, never focus on the infinity. Always focus on something closer so that you have a sharp depth of field behind the point where you’re focusing.
Aperture in Photography
A Beginner’s Guide to Aperture in Photography
There is nothing wrong with taking pictures with the camera on automatic, but if you really want to dive into photography, you will need to learn how to take pictures with manual settings. Photography is an art and with your camera in manual mode, you’ll be like a painter who controls every stroke of the brush. There are a few things that you will need to understand before you explore the world of manual camera settings. One of these things is aperture.
Aperture is a diaphragm like openig inside the lens which diameter is adjustable. By adjusting the diameter of the opening it controls the amount of light that passing through the lens and hits the camera sensor. However that needs to be balanced with a correct ISO setting (say ISO 100) and the right Shutter speed to get proper Exposure. Usually when a photographer sets the camera on aperture priority mode, the shutter speed and the ISO settings are auto adjusted by the camera. Aperture is measured in F stops. Usually when you read the specifications of a lens you will notice a specification f/1.2, f/1.4, f/1.8, f/2, f/2.4, f/2.8, f/4 and so on. This is the measurement of the maximum opening of the lens. The more the number following the letter F, the narrower is the aperture (this is a bit confusing). Wider the aperture the more light it can take in and that means the less time the camera lens needs to remain open. As such wider the maximum aperture faster is the lens. When one shifts from one f/1.2 to f/1.4 or so on, the aperture of the lens is reduced by a factor of 2. The shutter speed as such needs to be increased by a factor of 2 to match the lack of light entering the lens. As such increasing one and reducing the other or vice versa will have the same effect.
Both wider and narrower apertures have their own advantages. The former is used to create a soft blur around the focus point (or the subject) which is also known as bokeh and the later is used for increasing Depth of Field and is generally used for the purpose of landscape photography.
Here are a few things to remember:
Smaller f number = bigger opening = more light in sensor = shallow Depth of Field
Larger f number = smaller opening = less light in sensor = deep Depth of field
There are several things you can accomplish by manually adjusting fstop. You can choose what “depth of field” you want by adjusting fstop. Depth of field means the amount of focus you want in your photograph. A photo with a “deep” depth of field means that the whole photo is focused. A photo with a “shallow” depth of field means that only a certain area of the photo is focused and the other areas are sort of blurred.
If you want your viewers to focus on a certain object in your photograph, you would choose a shallow depth of field because the object will be focused and the background will be blurry. This will force the viewer to focus on your object.
If you want your viewer to focus on the whole photo, you would need a deep depth of field. Nothing on the photo is blurred. Everything will be focused. This is great if you’re taking a picture of the landscape and you want your viewer to appreciate everything in your photo.
Take your time to discover the different aperture settings your camera has. The more you practice, the more control you will have over your camera.
What is Shutter Speed?
Before it reaches the camera’s sensor, the light has to travel through some basic camera structures. First, it has to pass through the lens elements, then the aperture and lastly the shutter. Lens elements can’t block the light. Because they are made of clear glasses. Aperture can block the flow of light partially by increasing and decreasing the diameter of the opening. Only Shutter can block the light flow completely.
What is shutter?
Shutter is like a time keeper or stop watch of a camera. It controls flow of light by opening & closing it. It follows the same principles of window shutter. When it is open it allows the the light to pass through it & no light can pass through a closed shutter.
Shutter speed
It is the time between opening & closure of the shutter. shutter speed is expressed in seconds. It determines the length of time the shutter remains open to allow the light to pass through the lens aperture and expose the image sensor. For example a shutter speed of 1/30th of a second is slower than a shutter speed of 1/250th of a second. This is used in tandem with the ISO setting and the Aperture. When using a wider aperture a faster shutter speed is recommended to avoid over exposure. A faster shutter speed is recommended when shooting fast action photography or even sports photography when it is intended to ‘freeze’ the action. A slower shutter speed is used when special effects such as motion blur, light trails or water blur is required to be shot.

Faster shutter speeds are suitable when the camera is hand held. Comparatively when the camera is mounted on a tripod a slower shutter speed is feasible and manageable. Creative photographers use slower shutter speeds along with a low ISO, wide aperture (in manual mode) and a Graduated neutral density filter to capture water trails or even motion blur in broad day light.

Understanding ISO
The sensitiveness of the sensor to light is also known as ISO. In order to understand this better think of walking from a bright lighted room straight into a room with hardly any light at all, or a dark room. Once you walk in, your eyes won’t be able to see a thing. Give it a few minutes and your eyes will adjust to the darkness and you will start to see your surroundings. Your eyes automatically compensate for the lack of light by increasing the sensitivity (ISO) of retina (sensor) or increasing the diameter of Irish (aperture). Camera does the same thing with ISO with the help of Aperture & Shutter Speed.
In the days of film cameras users would load films of different speeds (ISO) depending on the lighting condition in which they would be shooting pictures. If they would be shooting in low light conditions, they would load the camera with a high ISO film and vice versa. When digital cameras replaced the film cameras of yesteryears, the concept of ISO remained the same but the films were replaced with electronic sensors. Still today, camera manufacturers refer to the sensitivity of the sensor with the term ISO. If you check the specifications of a DSLR for example, you would find details such as ISO 100 – 6400. What it means is basically that the sensor is able to shoot images in a range of 100 – 6400. It can range from 25 to 256000. Higher the ISO number, higher the sensitivity. Usually ISO 50-400 is considered low ISO. ISO 800 and up are considered highISO. They both have their advantages & disadvantages.

ISO Menu
High ISO
High ISO lets you take photographs at locations where there is a lack of light & higher shutter speed is required to freeze the action. For example in indoor sport or wedding ceremony where even widest aperture is not enough to provide sufficient light for a shutter speed to freeze the action. In that situations, camera compensates for the lack of light by increasing the ISO. Now, in low light situations, you could use a flash, but if you don’t have one or you don’t like the effect of artificial light or in certain places where Flash are prohibited you can move to a higher ISO.
You should remember that although a higher ISO setting will let you get a correct exposure even with a poor light source, you will also get more digital noise. Digital noise is the small squares that you can sometimes see on photographs. Usually cameras (both DSLR and Point & Shoot) face an issue of noise when shooting pictures at high ISO levels. This happens because the filter array of red, blue and green are unable to properly identify the correct colors in the light waves and thus dark spots appear on the final picture. With a low ISO setting, you will hardly or not even see those squares, but with a high ISO setting, those squares are visible. Fortunately modern DSLR like High end Canon 1DX, 5D mark III) or Nikon D4, D700, D800 can handle noise very well and capable to produce clean images even at 3200 ISO.

Low ISO
On the other hand the lower ISO setting is generally used when there is lot of light around the subject or the subject is well illuminated or most importantly when more details with less noise is required. For example portrait & landscape photography the ISO setting is deliberately reduced to something 100 or less to produce more details.
However, a low ISO setting is also a cause for camera shake if you are holding the camera. It is not because of lower ISO, but usually for longer shutter speed. Because in low ISO setting sensor needs more time (longer shutter speed) to absorb light. With a slow shutter speed, the subject can move or your camera can move while the shot is being taken and you will end up with a blurred photo. Now you have two options, use external light source (Flash) or a Tripod.
You will need a bit of practice when using ISO. Take several photographs of the same subject, under the same light conditions, with different ISO settings. Keep a note of the sequence of ISO settings you used so when you view your photographs on a large screen, you can identify how these different ISO settings affected your photograph.
What is white balance & how to correct it?
White balancing is a problem that a lot of digital camera owners, and some of them with a lot of experience too, somehow choose not to address to, don’t know how to address to or downright just don’t know anything about. As a result we come across expressions “I bet the girls were wearing white!” or something like, “honey you need a teeth whitener” while reviewing photos. Well, most of the time you dont have to put much of your gray cerebral power on white balancing. Your cameras “Auto White Balance” tool will handle it so nicely that you won’t even notice it. But some projects, like product or fashion photography demand color accuracy. You have to balance your white to get accurate color. Of course you can do it in post process. However, doing it before shooting will help you to save many work hours & hassle in post processing. Unless of course you have a digital camera with a sensor that is as adjustable as the human eye, you will have problems of white balancing when shooting in different light conditions. So what is white balance and how can we correct the problem? Since this is a part of a series that is addressed to the needs of photography enthusiasts just starting off and looking to master the fundamentals, it will remain an effort to keep things as less technical as possible.
What Is White Balance?
White balance is the process that ensures the color “white” (and along with that all other colors) appear as naturally as they normally looked to the naked eye in photographs. So, basically you shoot a girl wearing a white wedding dress and it will look white when you are viewing the images on your computer screen and not something gray, yellowish or bluish. Every light source has a temperature (color) which affects the color of the subject. Try shooting a portrait indoors with a fluorescent lamp as the light source and you will notice there is a bluish tinge on the final image. This is because of the incandescent light source that you used. Use a filament bulb and the color changes to yellowish. There is always a warm reddish tinge for all shots taken during the sunset or sunrise.

White Balance Menu of Canon
DSLR
Preset White Balance
Thanks to modern digital camera technologies almost
every piece of camera that hits the market has some sort of white balancing
feature in it. These are some of the most common ones that you can find on them
– (a) Auto, (b) Tungsten, (c) Fluorescent, (d) Daylight, (e) Cloudy and (f)
Manual. Some, such as the latest Canon 5D Mark III, has a color temperature
option as well.
Preset White Balance menu of Nikon DSLR
Manual White Balance & How to set it?
Using the manual mode is preferred by professional photographers. Since their work is related with their income they cannot afford to see white turning into something else after they release the shutter. But anyone who is in pursuit of perfection can use these settings. Preset modes in the cameras give the option to test the white balance by using a test shot. This is done usually setting the camera at a wide aperture pointing at white wall and then measuring it by a test shot. Once the test shot is taken the camera automatically adjusts the white balance to optimum level and using that as the reference point adjusts the other colors as well. This is probably the best way to ensure the colors look natural. Obviously on the fly, specially using compact cameras, the pre-set white balance settings are very useful. They are fast and quite accurate too. Of course if you don’t like any of this, there is a simple solution. Set your camera to Auto mode and click away!
Understanding Bit depth
We have heard of the terms bit depth and resolution and even megapixels. Often people use them interchangeably. This is wrong as they although related to the effective resolution of the camera system, are different in their inherent meanings. Let’s take one of them, bit-depth and have a deeper look into what it is.
Digital photography is all about numbers representing different shades of color. In the earlier days of black and white digital photography, processing systems embedded in computers and powering the overall image processing could only play around with 1 or 0 (two numbers). These were essentially 1 bit computer systems which could produce only 1 number at a time. These were assigned to black and white and each pixel thus could have only one of 2 possible tonal shades. Gradually as computer systems and along with that processing engines improved, 2 bit 3 bit and gradually 8 bit image processing systems became a reality. A 2 bit processing engine could represent 4 shades represented by the numbers 00, 01, 10, and 11. A 8 bit processing system could create a image file that has 256 combinations or colors (2 x 2 x 2 x 2 x 2 x 2 x 2 x2). In order to represent a picture that has the optimum number of colors in it (which is required to create a picture with no color jerks) is 250. As such an 8 bit image processing system is the basic requirement for color digital photography.
We also need to understand that at the heart of the image processing system is the camera sensor. This is that one element of the camera which has light sensitive photodiodes and which captures the reflected light from the subject. Now each photodiode is like a chamber which captures the light. However these chambers are not designed to capture all the light waves. Only three primary colors, red, blue and green are captured. We have discussed about Bayer Pattern elsewhere on this website. It is the most common forms of filter patterns that is used in modern digital camera sensors. It captures more of the green light then the other two primary colors due to the fact that the human eye is more susceptible to the green color.
A RAW file shot using an 8 bit image processing system has all the information to be able to convert it into a 24 bit image using a photo editing software. What it basically means is that each of the primary channels (or color channels) can capture 256 shades and thus has the potential to be converted into a 24 bit (8 x 8 x 8) image after post processing.
Modern digital camera technology has not stopped at 8 bit though. Camera manufactures have been churning out equipments which have still higher resolution of 12 bit and 14 bit. This means during post processing a photographer has a lot of tonal information in the image (if it has been shot in RAW). These are however heaver in file size and can easily overrun the buffer of the camera during shooting and also the memory card if one has to do a long shoot. Shooting RAW is thus advantageous when the photographer wants to preserve the full information that is captured so that he can produce the best quality pictures during post production and publishing.
Understanding Dynamic Range in Photography
This is a topic that even illustrious professional photographers find hard to handle and correct for. Dynamic range in a simple explanation can be expressed as the difference between the light and dark tones in the picture. So if you have a picture of a landscape, the amount of darkest dark color that you can see on one hand to the lightest of light colors on the other gives you the whole spectrum of dynamic range of the picture. As we know there is a whole band of colors that fall outside the visible spectrum and when these colors are unable to be picked up by the camera the frame appears unusually dark or white. When this happens, the dark appears too dark and the areas affected become underexposed. Conversely the highlights represented by white areas appear washed out.
Photographers use different methods to ensure that the pictures that they shoot have a reasonable dynamic range. Often the best method that they use is shooting three or more different images of the same frame exposing for the foreground, the background and the subject and then mixing them together using layers and masking methods in Photoshop to create a single high dynamic range (HDR) image. The images that they shoot are evidently RAW and they individually often don’t have the desired quality until they are mixed together to create the desired effect.
Simple methods such as additional lighting or using the built in flash becomes necessary when the live view histogram suggests that there is not really a decent dynamic range in the frame. In case there is no way to increase the amount of light, one can use the exposure compensation process or use a ND filter (discussed in details later).
Another tip to ensure a reasonably good dynamic range in the photographs (without using RAW or depending on post production to create HDR images) is to expose for the area that has comparatively a bit more light. Say if you have a challenging lighting condition shooting landscape. The mountains are dark and the sky is overexposed. You could try exposing for the sky by stopping down the exposure compensation. An extension of the same approach would be to use a neutral density filter. In this case a graduated neutral density filter would be more suitable. This will compensate for the brightness of the sky and thus make the information available from the shadow area more discernable.
Post production using specialized software is one of the preferred methods to salvage images which have been shot in RAW and lacked the right amount of dynamic range. Using these software one can recover to a large extent the highlights in the image and the information from the shadow areas.
The existence of a high dynamic range in the pictures is not always desirable though. This is true when you’re shooting black and white. Your pictures will have a lot more shades of gray and if you review the histogram the extreme left and right sides are bound to have more of the clustered skyscrapers. But it is a good thing and only means that you were able to shoot the picture the way you intended to in the first place.
What is Bokeh?
Bokeh is not a term that is commonly used in ordinary language. The term is rather associated to photography, so if you’re new to photography, then you may not be familiar with bokeh. What is bokeh and how does it work?
To understand bokeh a bit better, without risking over explaining it, have you noticed a photo with the subject on focus and the background out of focus? Take a closer look at the out of focus background, if the quality of the background, or if the background has smooth or rather rough edges, than that is what is called bokeh.
In photography there are two types of bokeh, good and bad. Good bokeh is when the out of focus or blurred background has smooth edges. Bad bokeh is when the blurred background has rough edges. However, depending on the type of effect you are going for, a bad bokeh maybe something that you want. This means that good and bad does not necessarily refer to their meaning but just a description of the two types of bokeh.
The quality of bokeh you can create relies on the quality of the camera lenses that you have. Higher quality lenses will be able to create a smoother bokeh. If you really can’t afford to buy high quality lenses for now, don’t worry. You can still create bokeh, not just as smooth.
In order to create bokeh, you will need to adjust your aperture settings for a shallow depth of field. This means that the object is in focus but the back ground is out of focus. This effect makes the viewer of the photo focus on the object rather than the background. You will not be able to create bokeh if you have your aperture set for a wide depth of field. This is because the whole photo will be in focus.
In order to control the quality of bokeh you create, practice with different aperture settings for a shallow depth of field. However, keep in mind that you will want to capture the entire target and the only parts of the photo you want to be blurred is the background.
Another thing to keep in mind is that bokeh will also be affected by the distance of the background from the target. When practicing bokeh at different aperture settings, make sure that you change the distance of the target from the background as well. When you do this, you can get a feel of how bokeh is affected not only by aperture settings but by background distance as well.
Bokeh provides a very cool effect on your photograph is used properly. There will be situations where you would want to create a bad bokeh effect and a good bokeh effect just won’t do. In order to recognize what these situations are, you will need to do a lot of practice with bokeh . Take plenty of photographs of different objects at different locations under different lighting conditions and you will find out what situations will require you to use a bad or good bokeh effect.
What is Moiré in Photography & How to avoid it?
When taking pictures of intricate repetitive patterns such as grid lines, embroidery, fine cloth or other geometric shapes (such as when taking pictures of architecture with numerous columns or pillars) one can face the problem of moiré. It is an unintentional pattern of lines and shapes that transposes on the final pictures as a result of the repetitive geometrical patterns that the camera sensor cannot discern perfectly. Moiré effects are caused when the camera sensor adds the second pattern (in addition to the first and the primary pattern which is the subject of the picture). The sensor then confuses between the two patterns and moiré is created.
To have a deeper look into why the sensor creates moiré we have to take a look into a camera sensor and its architecture. Modern digital cameras have sensors which have replaced the film camera systems of the yesteryears. The sensor has numerous tiny light sensitive photodiodes. Each photodiode can be compared with a chamber that captures light. However they can capture only a single of the primary three colors (i.e.; red, blue and green). The reason is if the photodiodes are sensitive to all the colors they will not be able to distinguish between each. A filter placed on top of each chamber is what helps in capturing one color and in effect keeping out the remaining colors. Arrays of photodiodes thus capture the three primary colors according to the filter on the top. There are several patterns used to capture light and the most popular is the Bayer Array. It has an alternating array of chambers and filters which is designed to capture 2 green light waves for every red and blue light waves. The reason is that the human eye (and therefore the camera, as it is designed very much on the same principle) is more sensitive to the green color. This overall pattern of red, green and blue is what creates the moiré.
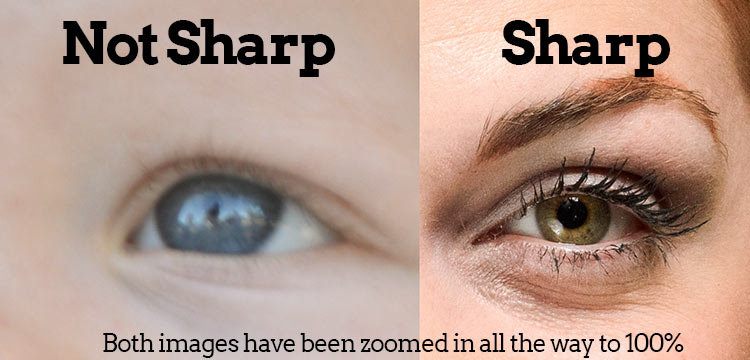
The optical low pass filter (OLPF) is a filter that is used in state of the art camera technology to ensure that moiré (and with that an additional problem of false color) can be eliminated. Nikon uses its OLPF in all of its current DSLR bodies, which is why there are no discernable moiré or false coloring in the pictures produced by the cameras. It is pertinent to note that using the OLPF can sometimes soften the picture. one can identify this with the loss of sharpness in the final pictures. Studio photographers when they are shooting RAW and does not counter the problem of moiré or false color may not like to use the OLPF. They prefer the images to stay sharp even when making a tight crop. A recent set of camera systems can be taken as a final evaluation to explain how the presence and absence of OLPF can affect the pictures.
The D800 and D800E are two camera systems that Nikon has recently launched. The first one has an OLPF and the second one does not use the same. The result is no false coloring and moiré in the D800 but the images are softer compared to the D800E which does not use the same filter. Photographers who have used both the cameras are however divided with those preferring to exploit the 36 megapixels for tighter cropping and sharper resolution at that levels going for the D800E.
Understanding EXIF data and how it can help us do better photography
Today, we shall be delving into what EXIF data is and why it matters to budding photographers. EXIF data has been used by many amateur photographers trying to get a hang of digital photography. It helps them to master the settings and controls of their camera. If you go through the EXIF of your entire collection, you will be surprised to note how a majority of them appears to be taken at the same focal length or at the same ISO. The ones that you consider are trash would often be around same specs as well.
The first thing that we should know is what EXIF stands for. It is an abbreviation of Exchangeable Image File. This is actually a large amount of information that your camera records along with the image and saves it on the memory card. It is quite simple to access that information as well. On a Windows computer simply right click on the image and go to ‘Properties’. If you are on a Mac click on ‘Get Info’. Another way to access the information is to access it using a photo editing tool like Photoshop.
What are the details that are available in EXIF data? – EXIF data includes information such as aperture value, shutter speed, exposure compensation, ISO, camera make and model, height and width of the picture, metering mode used, color representation, focal length, date the image was taken and a whole lot of other information depending on the camera make and model. Numerous modern digital cameras also come with GPS systems which burn the exact location data on to the image.
Why EXIF data is helpful for budding photographers? – imagine you are trying your hand for the very first time on a DSLR. You are unable to determine the right combination of aperture and shutter speed for your camera for a given amount of light. Other times you may be unsure why going for a higher ISO such as 800 in low light is creating noise in your pictures. Again you could be experimenting with motion blur on a slower shutter speed and yet be confused why the images are turning up overexposed. You will obviously try to make adjustments and shoot repeatedly. Instead of deleting the pictures that did not turn out well use a photo editing tool to analyze them.
Examining the EXIF data can give you valuable insights as to what changes you are having in the image quality when you implement the different settings. It also allows you to experiment with the settings and keep changing them till you start to associate each change in the settings with the resulting change in the picture quality. It is an important part of photography to shoot images, not always to achieve prize winning results but to keep experimenting and keep getting better. It is one of the most practice intensive professions out there and analyzing EXIF data analysis is definitely one of the best ways to approach it. Needless to say it also allows you to fine tune till you start taking better pictures by making calculations such as shutter time, aperture, ISO and even the kind of neutral density filters to use on the fly when shooting in different lighting conditions. It helps you basically to have better grasp at the technical aspects of photography so that you can compose a perfect picture in basically any lighting condition.
COMPOSITION
Rule of Thirds
Rule of Thirds: Simplest Way To Improve Your Composition Skills In Photography
Rule of Thirds
Although it may sound a bit far fledged but the rule of thirds (also known as the divine proportion) is actually derived from the Fibonacci sequence of numbers. Thanks to the best selling book by Dan Brown we all know what that sequence is and who derived it. That’s right, Leonardo Da Vinci; who some say was the smartest man who ever lived. So what is the rule of thirds and how it works; and most importantly can we break the rule and still shoot great photos? Let’s find out.
What is Rule Of Thirds?
The rule of thirds is simple to describe but is not simple to comprehend why it works. Imagine that your view through the viewfinder is divided by four intersecting lines, two horizontally and two vertically.

Rule of Thirds
The result is that the view is divided into 9 equal rectangles with four points where the lines intersect. Imagine the grid lines of tic-tac-toe and you will get the picture. Right, we are all set. Each intersecting point is also known as the power point (some also refer it as the sweet spot). For some reason the human eye always kind of gets attracted by these imaginary intersecting points. Anything important on or around these power points make the photo look perfect and in balance. This is the part which is difficult to comprehend. Why the human eye does always focuses on the power points? It is hard to imagine why so let’s just accept it as a basic fundamental of a well balanced photograph.
How to apply Rule Of Thirds in Photography?
There are three easy ways to apply or playing with rule of thirds. Actually they are quite simple & easy to master. They are: The Horizontal lines, Vertical Lines & Power points.
The Horizon
Let’s start with placing the horizon, specially if you shooting landscape. The secret is, if you want to emphasize the foreground place your horizon close to the top horizontal line.
The Rule of Thirds
This way, the photograph is more balanced because there is enough solid ground in the entirety of the scene without overwhelming the lightness of the sky or the horizon. Same way when the horizon is placed below the second horizontal line, it emphasizes the background (for example sky), there is slightly more sky showing, but the effect is still almost the same.
Vertical lines
Dont forget the vertical lines as well. Simply placing the main subject close to any one of the vertical lines may help you to balance the frame & negative space.
The Power Points
The next point is, the key elements of a photograph should be place on or around these four power points. This automatically balances the photograph and makes it more pleasing to the eye. Let’s take an example. Most amateur photographers have an idea that to shoot a perfect portrait the subject must be positioned bang in the middle.

Well sometimes it works, but sometimes, if you can simply put the main elements such as one of the eyes of the subject or may be something such as the setting sun in the horizon (for a landscape shot) on one of the power points the photograph looks a lot better.
Try this, it works!
Just that, you feel this is worth the while and going to seriously affect your compositions, here is a small background. Even before photographers figured this out, artists, sculptures and painters have been using this for hundreds and thousands of years. So this is something that has been well tried and tested and if you can believe me it really works.
Breaking the Rule Of Thirds
So is the rule of thirds the defining rule of photographic compositions and anything and everything shot with a lens and a roll of film or a sensor must follow this? Not quite. While it does make a more dramatic effect, there are plenty of situations where the rule of thirds don’t apply or simply won’t work. Say when shooting a fast action photo which catches a moment in time and freezes it. The absorbing moment in itself is a source of pleasure. Of course in such circumstances it is impossible to actually follow the rule of thirds (and glad that it is so). Another example is when you want to shoot motion blur. Photographers who understand the rule of thirds never shy away from breaking it in order to shoot more intriguing pictures. In photography at least, nothing is laid down in stone and experimentation is what keeps things interesting.


